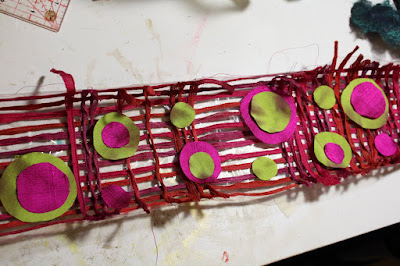
Yesterday, we stitched lots of ribbon onto some soluble film as the first step in creating a scarf. Today, thanks to my young friend Andrea, you get to see me cutting out lots, and lots, and lots of circles from silk fabric (It's possible I was about to topple off my chair from tediousness!)
But, how cute are they?! So, in the spirit of this being a 'lesson' and all...find yourself a couple of lovely fabrics, whose colours sing with your stitched down grid of yarns, and go ahead and cut out a bunch of circles. These are 3 different sizes and the templates I used were the bottoms of : a powdered stock jar, a tiny tea cup and a teeny tiny paint squirt bottle. Please don't ask me how many...I'd have to go dig out the scarf and count them...and numbers just don't make me happy! Trust your own sense of what looks good and what makes you happy...I'm all about making you happy.
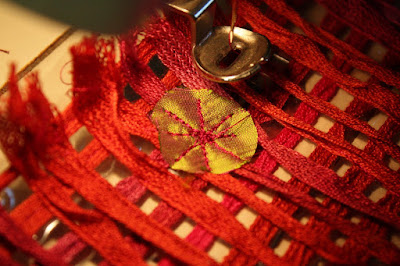
Time for a little more stitching. This is my free machine embroidery foot on Bertha, my very old, and very trusty Bernina (poor Bennie - my trusty new Bernina had to go to the doctor for a check up; she's been feeling a bit scratchy lately.) You can use your machines free machining foot - sometimes called a darning foot and the Janome's call it a pogo foot. OR, you could use your ordinary straight sewing foot, and do a bit of straight stitching, throwing in some reverse and a few U turns. Till you get something that looks like this:
What you're aiming for here, is to stitch this darling little circle onto at least two different strands of the yarn underneath. also layer smaller circles over bigger ones and stitch them all in place, quite randomly across the whole scarf.
Time for the fun part! Get thee to the laundry tub, fill it up with cold water (that's what Romeo likes) and send your scarf for a swim!
The Romeo will dissolve, firstly by going kind of cloudy and gluggy (at which point you may feel dismay and panic - but don't! It's all OK!) The best thing is to pop the scarf into the water and nip outside to hang out your washing or fed the cat, or even better, make yourself a cuppa. My point is that you need to leave it to soak and soften and fully dissolve for a while. When you return, your scarf will look limp, saggy and sad. This is good. Empty the water out and run some fresh cold water over your glorious creation to remove any final traces of soluble.
Next - dry your scarf. I opted for a trip to the clothesline and the sunshine (wasn't it a beautiful day?) but, you can drape the darling over the back of a chair inside, or wherever it is you hang damp stuff to dry and drive your family nuts...
The finished product! There are a few straggly ends there that need to be trimmed off, and we're good to go. Have fun creating one of your very own!


5 comments:
Tracey, It looks even better now!! I left a comment in the wrong section - please see comment in your previous entry. Derrrr - it's Friday & that's my excuse. Olley.
Hey Olley! I will find your comment regardless of where you leave it! I think a workshop may be in the pipeline...I went to Gail's for a Genesis fabric painting day, and we talked about a scarf workshop, so that could happen in the future...
I'm so happy you like it!
Tu trabajo es precioso y has enseñado cada paso perfectamente... un post maravilloso!!!
Tracey,
So glad to see you back and, to see you!
You have such a lovely writing voice. It's Saturday here, I'm exhausted from the work week and yet reading you makes me smile, especially when I'm reading directions for such a wonderful looking scarf. Thanks for your guide--& I mean that in all sorts of ways !
Jesus Belly - thank you for your kind words! It's lovely to hear from you again!
and Hannah, thank you as well...hope you can recover some energy soon, and I love hearing that you found a smile among my ramblings...That has made my day!
Post a Comment