Showing posts with label textiles. Show all posts

Saturday, August 11, 2012

"Worthy...Of Love and Belonging"

Worthy... of Love and Belonging
hand felted panels on paper
© 2011 Tracey Hewitt
A while back, I was commissioned to create a piece of work for our local doctor and his wife, as a gift from his staff, in honour of their 30 years of service to our little community. It was a special opportunity to pour a little of my own heart into a piece that, as well as honouring his dedication to this community, felt like a personal thank you note. Doctor Bruce - as he is fondly called (technically he is Dr A.B.Chater) - has delivered babies, counselled troubled souls, mended broken bones, stitched open wounds, fished metal fragments out of eyes, removed injured or diseased toe and fingernails, dealt with 
anaphylactic shock, torn ligaments, bad backs and more - and that's just for my immediate family! He's a very busy man.


Yet, when the tricky things happen - and, for some reason, they have happened often around here over the years - he's there with a smile and a reassuring voice, and immense skill, to put the pieces back together again (A bit like all the King's horses and all the King's men really!)


So, "Worthy... of Love and Belonging" came into being. A series of hand felted panels, embellished with turquoise chips, beads, hand stitching and even some recycled, re purposed beer bottle caps attached; mounted onto watercolour paper.


Here's an excerpt from the artists statement that went with the piece:

The felt panels – to me – represent diversity. The diversity of characters in the patients you care for; of the illnesses and accidents you minister to; and of the medical services you offer at Theodore Medical. All three categories broad, extensive and varied. The panel concept started in my mind as felt banners, or pennants – like the sports pennants of our schooldays - representing achievements. There are no doubt nowhere near enough here to honour all your achievements, but hopefully the whole is greater than the sum of its parts!
The turquoise band represents the Dawson River. An integral part of your lives, and the life of our whole community, and - like the Dawson - it binds the elements together. I chose turquoise gemstone chips as a reference to the belief of many ancient cultures that turquoise holds great powers for healing.
You’ll notice the repetition of some elements four times on some of the panels – recognizing your four sons who call Theodore home.


Worthy...of Love and Belonging was mounted on white matt board and framed in a simple white frame. (which isn't in these photos, because I am far from having mastered the art of  photographing art work under glass. I'm sure there must be a way....have you got any tips for me?) 

Thanks to the staff at Theodore Medical for giving me the opportunity - and having the faith in me - to create this piece. I loved every minute of it!

Tuesday, August 30, 2011

The Latest Scarf


How good is your imagination? Can you imagine this scarf wrapped around a living human beings neck, rather than around the not-at-all-humanoid form of the citronella oil burner? Mabel, the dress form, has been called to perform a higher purpose, which has been fine - right up until I wanted to share the latest scarf creation with you, and had no model. (I'm kind of frightened of that hold the camera up in front of yourself and click style of portraiture...basically the camera is too close, and at that range there are too many wrinkles and saggy bits. I care for you way too much to subject you to such an ordeal!)
I'm a bit excited about this scarf...


Finally, some of that lace that's been languishing in the lace box for who knows how many years, is finding a home. I discovered a great paint - on dye from The Lace Cottage, which has given colours that worked really well with this vintage look ... Added to dyed silk tissue, and a somewhat random assortment of yarns and silks - It turned out pretty much as I'd hoped.


All that's missing is a model...I enjoy 'my girls'* company so much that when I have them here to visit, I don't think of suggesting we stop chatting (and laughing and drinking wine or eating choc chip cookies) to do a photo shoot; so I'm left with the outdoor furniture to do the holding up of the latest creation.

I guess I could always ask Garfield to help me out... the colours would flatter his complexion, I'm sure!


*FYI - 'my girls' are in fact my handsome princes significant others...I'm blessed to have them in our home often, and after many years of being the lone female in the herd, it's a treat to share these baffling males with some equally baffled- by- them women.


Thursday, June 9, 2011

Soluble Film Scarf Making (Or, it's so cold my brain can't think of a more 'catchy' title for this post!)


Last Saturday, a handful of lovely ladies (including Meredith, here)  gathered at the CWA hall in Theodore and made scarves. Beautiful, colourful, snazzy, yummy scarves!

The scarf workshop is my favourite one to teach - everyone finishes at least one scarf in a day, they are always really excited with the results of their days work, and participants seem never to fail to have fun. What's not to love?!


I mean, how happy does Melinda look here? And that smile of hers made me extra happy, because she lost pretty much everything in the floods earlier this year. Her enjoyment heightened all our enjoyment.


Andrea showed everyone how to tie her "Andrea Knot", which is quite possibly the coolest way to tie a scarf that I have ever seen.

Thanks to all the gorgeous girls who shared their Saturday with me, and let me take their photos so I could share the day with everyone here. While I know you all enjoyed the day, I'm not sure that you will ever know how much I enjoy sharing these techniques with you all... your delight in the works you create is infectious and exhilarating!

Wednesday, October 6, 2010

Fun with Fabric Paint


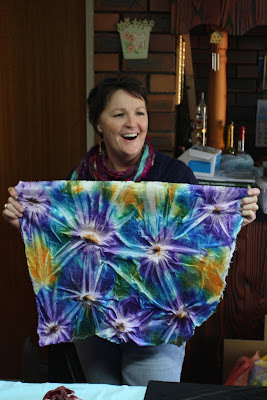
A little while ago (I've been intending to post about this for ages) I had a great day with Gail Van Itallie and some of the BAVA members at Gail's place in Biloela, playing with the Genesis Creations range of fabric paints. We scrunched, and sprinkled salt, folded, wrapped and generally manipulated fabric in all sorts of  ways and created some pretty awesome looking painted fabrics.


Kym grabbed my camera and snapped me posing with this bit of fabric I was very excited about... what do you think I should use it for? I'm having trouble deciding!


Kym (left) and Gail cuddled up beside the shaving foam...Yes, we marbled fabric using shaving foam as a medium to 'float' the paint...works a treat (and smelled kind of good too...) It's possible that there may have been quite a lot of laughing and mucking around going on in Gail's house that day...But what cracked me up most of all was the 'craft paper'...


It began the morning as what we all recognized as a roll of toilet paper. Gail held it up, as if it were a science exhibit, and said "This is toilet paper".

Then, she laid it on it's side, squished down hard and fast with her hand and said "Now it's craft paper!"

I learned so many things that day! And, I ordered a bunch of paints, which are still in their package on a shelf in my studio...One day very soon, they will be liberated from their nesting place and used in the manner which they were intended. I'll let you know how that goes...


Friday, August 20, 2010

Step by Step Scarf Lesson 2


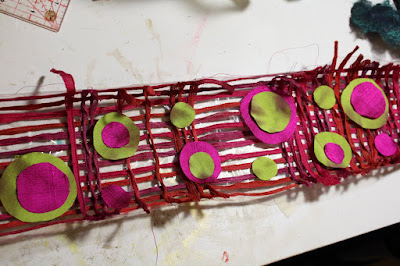
Yesterday, we stitched lots of ribbon onto some soluble film as the first step in creating a scarf. Today, thanks to my young friend Andrea, you get to see me cutting out lots, and lots, and lots of circles from silk fabric (It's possible I was about to topple off my chair from tediousness!)


But, how cute are they?! So, in the spirit of this being a 'lesson' and all...find yourself a couple of lovely fabrics, whose colours sing with your stitched down grid of yarns, and go ahead and cut out a bunch of circles. These are 3 different sizes and the templates I used were the bottoms of : a powdered stock jar, a tiny tea cup and a teeny tiny paint squirt bottle. Please don't ask me how many...I'd have to go dig out the scarf and count them...and numbers just don't make me happy! Trust your own sense of what looks good and what makes you happy...I'm all about making you happy.


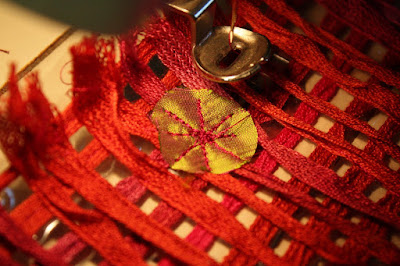
Time for a little more stitching. This is my free machine embroidery foot on Bertha, my very old, and very trusty Bernina (poor Bennie - my trusty new Bernina had to go to the doctor for a check up; she's been feeling a bit scratchy lately.) You can use your machines free machining foot - sometimes called a darning foot and the Janome's call it a pogo foot. OR, you could use your ordinary straight sewing foot, and do a bit of straight stitching, throwing in some reverse and a few U turns. Till you get something that looks like this:


What you're aiming for here, is to stitch this darling little circle onto at least two different strands of the yarn underneath. also layer smaller circles over bigger ones and stitch them all in place, quite randomly across the whole scarf.


Time for the fun part! Get thee to the laundry tub, fill it up with cold water (that's what Romeo likes) and send your scarf for a swim!


The Romeo will dissolve, firstly by going kind of cloudy and gluggy (at which point you may feel dismay and panic - but don't! It's all OK!) The best thing is to pop the scarf into the water and nip outside to hang out your washing or fed the cat, or even better, make yourself a cuppa. My point is that you need to leave it to soak and soften and fully dissolve for a while. When you return, your scarf will look limp, saggy and sad. This is good. Empty the water out and run some fresh cold water over your glorious creation to remove any final traces of soluble.


Next - dry your scarf. I opted for a trip to the clothesline and the sunshine (wasn't it a beautiful day?) but, you can drape the darling over the back of a chair inside, or wherever it is you hang damp stuff to dry and drive your family nuts...


The finished product! There are a few straggly ends there that need to be trimmed off, and we're good to go. Have fun creating one of your very own!

Thursday, August 19, 2010

Step by Step Soluble Scarf Lesson 1


I have been promising...well, it's time to make good on the promise! Get settled in for part one of your very own soluble scarf lesson!

Begin by procuring some soluble film. There are a number of soluble films on the market, and if you're into research and discovery, you could test all of them to see which ones you like best, or, you can take my word for it that for this particular style of scarf, Romeo is best! I tell you this because it's reasonably heavy (in soluble film terms), tolerates a reasonable amount of humidity in the air and moisture on your hands without turning all gooey, sticky and generally disgusting while you're working on it. It can also handle quite a lot of heavy stitching without tearing - that's not such an issue with this particular scarf, but makes it a very versatile film.

The Romeo is the clear plastic looking stuff in the photo above, it is joined by some hand dyed silk ribbon/yarn, which will be the 'guts' of the piece, and some silk yardage, which will serve as the snazzy details.

Begin by cutting the romeo into a long, narrow rectangle (pretty much a scarf shape...who would have imagined?!) an inch or two bigger around than you want the finished scarf. If you need to create a bigger piece - just whiz it together with your sewing machine, one piece on top of the other.
 

This little foot is an optional extra. You can achieve the same result by carefully running the yarn under your normal machine foot, but if you have one of these - this one is on a Bernina - your life will be complete!


Now - get sewing! Feed your ribbon/yarn (sorry, I can't decide just what to call it...) through the little opening in your foot and start stitching rows of ribbon down the length of your Romeo.


Keep sewing...These are stitched lining up the edge of the foot with the next row of yarn - no more than a half inch gap between the rows.


OK, now it's time to change direction. The trick with soluble films is to create a net or grid effect, so that when the film is washed out, all your yarns and stitches will be well connected to one another. You'll see up in the top left hand of the photo that instead of cutting the yarn and starting again, I've just swung it around and left a loop - saves yarn and saves time - and I'm all about saving time! We'll just snip through those little suckers later on.


Here is the piece, all stitched up, it's 'guts' in place...ready for part two, which will involve that delicious looking silk from the first photo.


You'll notice that as it hangs around Audrey's neck, I've left some more spaces between those short runs across the scarf. You can go this way, or you can stick with the even, close together spacings right along...whatever blows your frock up really!

If you're hunting for Romeo (or, like me, live a long way from anywhere you can walk in and buy some), I can share with you that I get mine from Dale Rollerson at the Thread Studio. Dale looks after her customers wonderfully well, and has all kinds of treasures that I can't live without!

Lesson 2 coming up soon!

Thursday, July 15, 2010

Teaching - A Wonderful Way To Learn...Blackall Style!


Meet Jill. It's all her fault. She's the one who tracked me down and asked me to do a couple of workshops in Blackall. I have to wonder if it really is OK to get paid for having that much fun! She's also the one who patiently directed me to find her home in the drizzly rain (that took three separate phone conversations, at the end of which, I'm certain she was worried she'd employed a complete fruitcake!...I did struggle with the 'head west ' direction when there was no sun out though! We had a good laugh about it all later...) Jill looked after me SO well! I enjoyed wonderful food and hospitality throughout my stay. My 'flat' at the Cultural Association Centre (which I'll do a post on soon) was very comfortable, and everyone I encountered in this lovely town was remarkably welcoming. There is much to tell you about the trip, so there'll be more photos to follow, including the fabulous sculpture dotted around the town and the great Cultural Centre facility that this creative community puts to excellent use.


While this isn't a great photo, it gives you an idea of the size of the workshop area - this was once the dining room in the days the centre was a student hostel. The girls are busy exploring different mediums, making beads, silk paper, textile bases...we managed to make a lot of mess while they created some very cool little pieces!


Lisa is Jill's daughter. I seem to remember her suggesting she hadn't sewn much...I think I must be mis-remembering, because she powered on and produced a couple of gorgeous scarves on soluble films. The one she's working on here ended up very lacy and light - a perfect summer accessory! (Clever girl, this one.)


In fact, they were all clever girls! Above, Penny and Jenny show off their creations, along with Robyn and Yvonne below... I was fascinated that at the end of the workshop, their scarves - that had been started the afternoon before -  all matched what they were wearing very well!


Jill had finished two scarves by 'modelling' time, and Lisa's lacy one is off drying on a railing while she has her picture taken.
My greatest hope is that these terrific ladies enjoyed the workshops as much as I enjoyed being there!  As is always the case, when I head off to teach people something new, I learn such a lot myself...watching these girls pick up the techniques I was sharing with them, and taking off to use them in their own unique ways was fascinating to me - they instinctively did things that I have never thought to try - like including wool tops in the scarf, that we washed the soluble out of with boiling water! I have always avoided that on the assumption that the wool would felt...Yvonne's didn't, and it created a lovely warm, thicker scarf - perfect for those cold Blackall winters! Of course, we were very careful not to agitate it too much as we washed out the soluble.

Thank you to each of you for your warmth, hospitality, thoughtfulness and interest (including Veronica and Sandra, who weren't available for modelling shots on Sunday afternoon.)

Stay tuned over the next few days for more about beautiful Blackall on the Matilda Highway...home of the Black Stump (which Jill tells me isn't the same black stump, in the same location, that was in the back of the school yard when she was a child!)


Thursday, March 4, 2010

Textile Tantrums

Dale Rollerson at The Thread Studio in Perth is organising another challenge this year. Here is my effort:

Deep Thought Therapy 20cm x 30 cm
© 2010 Tracey Hewitt

I had some pieces of canvas languishing at the bottom of a bundle - I wondered how they'd go painted, collaged and then stitched...well, this is how it went! I experimented with some mono printing, as well as lots of layering of paint and stamps and text from a very old book that I steal pages from for all sorts of projects. After all that, I added some assorted fibres under a sheet of painted vliesofix. Then came lots of stitching, appliqued fabric paper circles and finally, the swirly silk yarn couched down over the whole she-bang! There was a point (which seemed to last for a long time!) where I HATED this and could see no happy ending for it at all! Just at the crucial moment my Mum phoned, and reminded what I tell everyone else...if it's not working, just add more layers...Once again, of course, good old Mum was right. I quickly fled my sense of misery and quickly discovered the 'buzz' once more!

Thank heavens for Mums and an extra layer or two! The world is a better place because of them both!

Wednesday, November 11, 2009

Bush Christmas Sneak Preview!


Here is a shot of a corner of my office/studio, where my creations for Bush Christmas await a date with bubble wrap and tissue paper. It's been a frenzy of paint, thread, glue, paper, silk, bottle caps, grinder discs, embossing powder, sticks, wire, beads and more!


This little darling is constructed from silk paper that has been free machine embroidered, and adorned with a clasp created from an abandoned piece of 1980's jewelry (the 1980's are a treasure trove of funky stuff that was probably awful jewelry, but make great features and focal points!)


I think this might be my favourite piece..painted, stamped Khadi paper with a free machine stitched slip of a Fleur-de-Lis. The disc is a beer bottle cap, flattened out and taken to with metallic paint and embossing powders...(sorry about the cloudy patch on the photo - I had it all framed up, under glass - then tried to take the photo...always a challenge!)


Finally, the last stage of the 'work in progress' I started here a while back. The loose, lacy, net-like piece bonded nicely to a base of felt which had painted vliesofix applied, it received some more stitching to anchor it down, along with a tiny shimmer of metallic foil. The neat silk lining fabric has been languishing in a box for years - A cast off from my Grandmother, and just perfect for this belt!
The packing and paperwork are waiting...but before I go...if you're anywhere near Toowoomba, Queensland from the 20th to the 28th November, call in to the Masonic Centre in Neil Street and check out the amazing work on offer from creative types all over rural Queensland and New South Wales... I love being associated with Bush Christmas - it is such a rare and wonderful opportunity for the world to see what artists beyond the city limits are creating in sheds, spare rooms and sometimes even backyards! I am privileged to be in such illustrious company! The Bush Christmas website has all the details.


Wednesday, October 28, 2009

Working on Pieces for Bush Christmas


Aren't these colours lovely?! There's been some paint splashed about onto a variety of surfaces, in preparation for further creative pursuits...in other words, the rapidly evaporating time till Bush Christmas has got me in a frenzy! These pastel coloured chunks are rock salt, that was sprinkled onto some painted watercolour paper while the paint dried...this gives a very cool speckled effect, and the salt takes up a little of the paint colour. It reminds me a bit of the coloured rocks the boys used to have in the bottom of the fish tank years ago. The boys weren't all that into the fish - when the last one died, it was at least two weeks before one of them exclaimed in dismay "Where's the fish gone?" Heaven, my darling, but I promise I gave him a lovely funeral....


Thankfully, my days of fish funerals beside the toilet are long behind me now! Which has nothing whatever to do with this piece...but I'm a great believer in the benefits of gratitude (and expressing same!) The text here says: Success is liking yourself, liking what you do, and liking how you do it. (Maya Angelou) It's a definition of success I respect greatly, and now that I'm no longer needed to perform fish funerals (which I didn't like doing) I think I must be free to feel successful! This piece is worked on a base of tissue bonded to felt, with handmade silk paper embedded with feathers free machine stitched in place. The little collection of discs at the bottom are from the bottom up: an abandoned grinder disc, a bottle cap, and a neat stoneware button. The disc and bottle cap have been painted and embossed to look bubbly and lava like...neat! (and fun!)

Monday, October 12, 2009

The Next Installment


Well, the soluble film has been washed out of all that stitching...and, I was right..it's perfectly gutless, as you can see! Pretty in it's own way, but gutless! So, next step will be to come up with a firm base to anchor it down onto...I'm thinking maybe felt with a layer of painted vliesofix...?
In the meantime...silk base, lots and lots of snippets of threads and fibres and yarns and fabrics, some gold flake, all covered with a layer of chiffon...and machine stitched within an inch of it's life! This one is developing with a much more appropriate weight for a belt...looks promising!
But, for now, the men are all back for lunch...with more poddy calves in tow!! I might have to post a pic of them at 'dinnertime'...hungry little critters, and so cute! We have Sheila, Spanky, Cleatus...and the new babies are still to be named...Oh my!

Thursday, October 8, 2009

Sharing a work in progress


I thought it might be fun to document a 'work in progress'...what you see in this photo is a piece of Romeo (a cold water soluble film) upon which has been stitched a grid of straight and zig zag stitches, with some free machined circles being worked onto it. That little steel gadget in the top corner is the darning foot for my Bernina sewing machine...he's an especially good friend of mine! The darning foot that is; Bertha the Bernina is most definitely a she... My plan here is for a belt, or waist tie - which I've not done before...so I'm making it up as I go along. As you do...or as I do, anyway! As I'm stitching I'm starting to wonder whether this will be firm enough, or whether I'll need to add much more by way of fabric or loads more stitching. Many questions and uncertainties...not many answers...but that's how this whole adventure goes! I'll know when I know...and then I'll let you know!

In the meantime...I've just realised this piece is exactly the same colour as my page for Peta's book in our Altered Artists Book Collaboration . I posted pictures of it on that blog (click the link to go straight there!) I wonder what a fixation with the colour aqua reveals about my inner most self?

Thursday, September 10, 2009

This is what I've been working on the last week or so...Cuffs! Hopefully groovy, funky, fun bits of wrist adornment...
There's been silk paper bases with old lace painted to match and stitched on top; playing with layers of felt, lace, painted vliesofix, stitching and foils...

A thank you to my Mum, Carmel, for this snazzy bead - she knocked it up from some angelina film, metallic paint and embossing powder (clever, isn't she?)


There's a flurry of activity in the studio (well, at least a little more than there has been...) as I create some pieces for the couple of 'jobs' I have coming up. In October, my work will be featured in Rhubarb - the boutique with benefits. Our very own unique boutique in Theodore!
In November, I'll send some treasures off to Bush Christmas in Toowoomba, where they will join work from other rural and remote artists and artisans for a week (Check the link for dates and location!)