Monday, August 30, 2010

Of Towers and Turrets

How cool are these?
Deryn Mentock and Sharon Tomlinson are running an online class called Of Towers and Turrets, this photo comes from Deryn's Blog Something Sublime and I am very excited to tell you that I signed up and have been busy gathering supplies and painting backgrounds and collaging towers all weekend! So much more fun than pulling weeds and ironing! I keep hoping no one is heading this way to visit - it's getting to be a long time since I flexed my domestic goddess muscle! But I think it will be cooler to paint and resin a goddess than attempt to be one, anyway!

This class promises to offer a smorgasbord of techniques from collage to painting faces (which I am terrified of...but determined to master...) and from applying cold connections onto metals to setting artwork in resin in free form bezels. It sounds like so much fun! If you'd like to join the class, click on over to the class page. Things are already in full swing, but the class stays open till the end of December, so there's loads of time.

I thought I'd share with you my backgrounds, which are the first part of class. I've already picked up a few neat tricks...


If I go quiet here for a while, you may need to send a search party...they'll most likely find me under a pile of papers, metals and resin, sticky, smeary and blissed out!

Friday, August 20, 2010

Step by Step Scarf Lesson 2


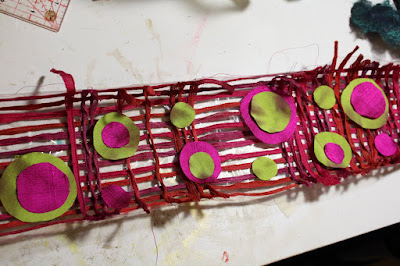
Yesterday, we stitched lots of ribbon onto some soluble film as the first step in creating a scarf. Today, thanks to my young friend Andrea, you get to see me cutting out lots, and lots, and lots of circles from silk fabric (It's possible I was about to topple off my chair from tediousness!)


But, how cute are they?! So, in the spirit of this being a 'lesson' and all...find yourself a couple of lovely fabrics, whose colours sing with your stitched down grid of yarns, and go ahead and cut out a bunch of circles. These are 3 different sizes and the templates I used were the bottoms of : a powdered stock jar, a tiny tea cup and a teeny tiny paint squirt bottle. Please don't ask me how many...I'd have to go dig out the scarf and count them...and numbers just don't make me happy! Trust your own sense of what looks good and what makes you happy...I'm all about making you happy.


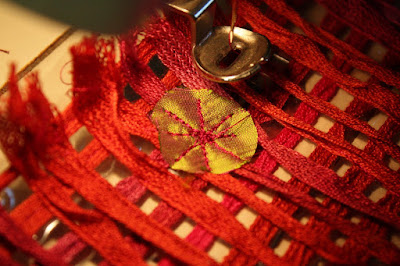
Time for a little more stitching. This is my free machine embroidery foot on Bertha, my very old, and very trusty Bernina (poor Bennie - my trusty new Bernina had to go to the doctor for a check up; she's been feeling a bit scratchy lately.) You can use your machines free machining foot - sometimes called a darning foot and the Janome's call it a pogo foot. OR, you could use your ordinary straight sewing foot, and do a bit of straight stitching, throwing in some reverse and a few U turns. Till you get something that looks like this:


What you're aiming for here, is to stitch this darling little circle onto at least two different strands of the yarn underneath. also layer smaller circles over bigger ones and stitch them all in place, quite randomly across the whole scarf.


Time for the fun part! Get thee to the laundry tub, fill it up with cold water (that's what Romeo likes) and send your scarf for a swim!


The Romeo will dissolve, firstly by going kind of cloudy and gluggy (at which point you may feel dismay and panic - but don't! It's all OK!) The best thing is to pop the scarf into the water and nip outside to hang out your washing or fed the cat, or even better, make yourself a cuppa. My point is that you need to leave it to soak and soften and fully dissolve for a while. When you return, your scarf will look limp, saggy and sad. This is good. Empty the water out and run some fresh cold water over your glorious creation to remove any final traces of soluble.


Next - dry your scarf. I opted for a trip to the clothesline and the sunshine (wasn't it a beautiful day?) but, you can drape the darling over the back of a chair inside, or wherever it is you hang damp stuff to dry and drive your family nuts...


The finished product! There are a few straggly ends there that need to be trimmed off, and we're good to go. Have fun creating one of your very own!

Thursday, August 19, 2010

Step by Step Soluble Scarf Lesson 1


I have been promising...well, it's time to make good on the promise! Get settled in for part one of your very own soluble scarf lesson!

Begin by procuring some soluble film. There are a number of soluble films on the market, and if you're into research and discovery, you could test all of them to see which ones you like best, or, you can take my word for it that for this particular style of scarf, Romeo is best! I tell you this because it's reasonably heavy (in soluble film terms), tolerates a reasonable amount of humidity in the air and moisture on your hands without turning all gooey, sticky and generally disgusting while you're working on it. It can also handle quite a lot of heavy stitching without tearing - that's not such an issue with this particular scarf, but makes it a very versatile film.

The Romeo is the clear plastic looking stuff in the photo above, it is joined by some hand dyed silk ribbon/yarn, which will be the 'guts' of the piece, and some silk yardage, which will serve as the snazzy details.

Begin by cutting the romeo into a long, narrow rectangle (pretty much a scarf shape...who would have imagined?!) an inch or two bigger around than you want the finished scarf. If you need to create a bigger piece - just whiz it together with your sewing machine, one piece on top of the other.
 

This little foot is an optional extra. You can achieve the same result by carefully running the yarn under your normal machine foot, but if you have one of these - this one is on a Bernina - your life will be complete!


Now - get sewing! Feed your ribbon/yarn (sorry, I can't decide just what to call it...) through the little opening in your foot and start stitching rows of ribbon down the length of your Romeo.


Keep sewing...These are stitched lining up the edge of the foot with the next row of yarn - no more than a half inch gap between the rows.


OK, now it's time to change direction. The trick with soluble films is to create a net or grid effect, so that when the film is washed out, all your yarns and stitches will be well connected to one another. You'll see up in the top left hand of the photo that instead of cutting the yarn and starting again, I've just swung it around and left a loop - saves yarn and saves time - and I'm all about saving time! We'll just snip through those little suckers later on.


Here is the piece, all stitched up, it's 'guts' in place...ready for part two, which will involve that delicious looking silk from the first photo.


You'll notice that as it hangs around Audrey's neck, I've left some more spaces between those short runs across the scarf. You can go this way, or you can stick with the even, close together spacings right along...whatever blows your frock up really!

If you're hunting for Romeo (or, like me, live a long way from anywhere you can walk in and buy some), I can share with you that I get mine from Dale Rollerson at the Thread Studio. Dale looks after her customers wonderfully well, and has all kinds of treasures that I can't live without!

Lesson 2 coming up soon!

Friday, August 6, 2010

Bye Bye Babies...


It's time to say goodbye...Minnie's babies are all heading out into the world, to discover their new families and homes. This photo does me in...how cute are they? So soft and snuggly and small and delightful and bright and fun...


Awww...
"No, it wasn't us who chewed your favourite shoes and demolished your new plant; and we would never leave unmentionable deposits beside your back door"...

Trust me when I tell you that as cute as they are, as adorable and fluffy and sweet as they look - I'm not going to be heartbroken when the last one leaves on it's journey to a new home in a couple of days. Puppies can be a joy - but man, they can be a force of destruction unlike any other (except maybe three year old boys - but those days are in my past, and that's where I'm content to leave them!)

They are cute though, don't you reckon?


Monday, August 2, 2010

Announcing...The Andrea Knot!


Say hello to Andrea...Isn't she gorgeous?
The reason I'm introducing her to you (besides the fact that she's young, fresh, delightful, and you need to know her) is that she has created a remarkably snazzy scarf knot; and knowing that sometime in the near future you will know how to make your own unique scarf, I thought it would be great to share this nifty knot with you to use with your new scarves. You will know this in the near future, because if I ever remember to pick up my camera as I'm beginning to build a scarf, instead of as I'm almost finished it; I'm going to post a step by step scarf making post.

Andrea and I - among others - enjoyed a Girls Night In at Rhubarb last week, and I thought it was a great opportunity to snap her in her scarf so I could show you. Only problem was, I didn't take step by step photos (there's a pattern emerging here, isn't there?)


So, here's a closer look, and I'm going to attempt to explain it to you. If the following has you tied in knots, half strangled, and not looking this swish, let me know in the comments, and I'll get a step by step photo shoot going on my trusty studio companion Audrey. (Audrey is a dress form whose name is subject to change without notice!)

So...using a long, rectangular scarf, fold it in two, so the short ends meet. pop it over the back of your neck. Now, there should be a loop on one side, and two ends on the other. Take the end that is sitting underneath the two ends and slip it through the loop. Next comes bit that makes it all cool....Your loop will have a side more to the front and a side closer to your chest. Get hold of the piece that is sitting against your chest and gently lift it to the front of the side that's at the front - you'll make a figure of eight with the loop side, slip your hand through the new loop on your figure of eight and pop the remaining end through that loop. Gently pull it into position and tighten it to where you need it to sit, and you're done!

Andrea tells me she discovered this when she had put her scarf on in the traditional slip the two ends through the loop and head off way, and had one end slip out in the course of her day, and kind of tucked it in without looking and discovered it was totally cool - it looks almost like a plait, and I can report that when tied like this, your scarf won't move or slip (at least, none of mine do!)

Andrea has generously shared this knotty technique with me to share with all of you - all I ask is that it hereafter be referred to as The Andrea Knot. It happens that Andrea's surname is French...but I think French Knot is already taken!